With the front panel removed I took the opportunity to clean the threads on the captive plates that the door hinges attach to.
Thursday, 16 January 2014
Back to the cab II
First job in replacing the front panel was to cut the old one off. I didn't need to keep the old panel so I cut it off roughly with the grinder and then removed the remaining flange with a grinder rather than drilling the spot welds. This leaves the remaining flange nice and solid without holes which I hope will make attaching the new one easier.
It seemed silly not to blast clean the bits exposed by removing the front: the door pillars and the back of the dashboard.
Sunday, 5 January 2014
Back to the cab
With the panels painted I stored them away and fetched the cab back into the workshop.
The 'new' panel is rust-free but has plenty of repair work so it will take quite a bit of work to make it look reasonable. I wish I had bought this one that was on eBay a few months ago...
The next task is to replace the rusty, dented front panel with the one that I cut off the old cab and repaired. The existing panel is rusty all along the lower front edge and it has a dent in one corner that has thrown up a crease. I could not see an easy way to pull the corner out so I decided to replace the whole panel.
Thursday, 26 September 2013
Painting the panels
Not too much to say other than I sprayed epoxy primer onto all the stripped panels and here are some pictures! I sprayed them in two sessions over two weekends: first the insides of all the panels, then the outsides.
I think that there will be one more round of blasting and spraying later in the build. I still intend to paint the wheel rims, the lower grill panel and a host of small parts such as door hinges.

I think that there will be one more round of blasting and spraying later in the build. I still intend to paint the wheel rims, the lower grill panel and a host of small parts such as door hinges.
Thursday, 5 September 2013
Last of the blasting (well almost)
I've now completed the first (and biggest) round of blasting and it was nice to pull all the bits out of the workshop and give it all a clean. My plastic tent makes a lot of difference and contains the grit well but the fine paint dust gets everywhere.
Apart from the odd little repair the remaining panels are in good shape.
| Two engine covers |
| Two mudguards |
| Two outer guards |
| Two lower engine cover panels |
Sunday, 1 September 2013
Cab front panel
The panel that forms the whole front of the cab below the windscreen is the worst part of my new cab. It is dented on one corner, repaired in the middle and rusted along the lower edge. For this reason I plan to replace it with the panel from the old cab which seemed to be better.
Removing it was no mean task with nearly 200 spot welds to drill out!
Cut out for patch and new metal welded in. If you have not discovered flap wheels (on a small grinder) for dressing welds they are simply brilliant: far better and quicker than a grind wheel.
The other rust area is in the middle where the Bedford badge bolts on. There is a moisture trap behind the badge where a reinforcing bar is attached.
Removing it was no mean task with nearly 200 spot welds to drill out!
The panel is quite solid but after stripping I found that quite a bit of repair work lurked under filler. I still think that it is better than the alternative.
Both the front lower corners have small rusty areas.
| Rust holes with outline for patch panel drawn. |
The other rust area is in the middle where the Bedford badge bolts on. There is a moisture trap behind the badge where a reinforcing bar is attached.
For this I cut a repair section from the other cab, bolted it on using the badge mounting bolts to align it and then drew around it.
Finish weld and dress with a flap wheel. I welded small sections and cooled the panel with the airline between each but there is still a distinct warp in the panel caused by the welding. I spoke to a local business who restore classic cars and their guy seemed to think this not a great deal. He said it was bound to do that and it would be simple enough to fix by shrinking but best to leave that until it is attached to the cab because the panel is quite floppy on its own.
Thursday, 22 August 2013
Front Quarter Panels
The small front quarter panels where the headlights mount were in good condition on the original cab although they took quite a bit of drilling and cutting to get off. I'm pretty sure they are replacement panels.
After stripping and knocking out some minor dents there was one repair job to do.
The lug that bolts the panel to the grill bar was missing and the panel has been welded to the grill bar. It should look like this:
Then welded in place.
Thursday, 8 August 2013
Inner door skin repairs
Both doors had a small area on the lower corner of the inner to repair.
This I patched in the same way as the outer but changed the MIG wire (and tip) from 0.8mm to 0.6mm. This makes a lot of difference because it allows the MIG to run at its lowest power and makes welding thin sheet a lot easier and neater.
One of the doors had further damage that needed repair:
The door stay had been ripped out of the door bending and cracking the inner panel that strengthens the hinge. Without the door stay, the door will get damaged the first time the wind catches it so it needed repair. I cut out a section of the door jam with the grinder and hammered the damaged metal back into place.
Then I welded up the cracks and put a bead right around the hole to thicken and strengthen it.
Then I welded the cut section back.
A couple of other cracks needed welding up.
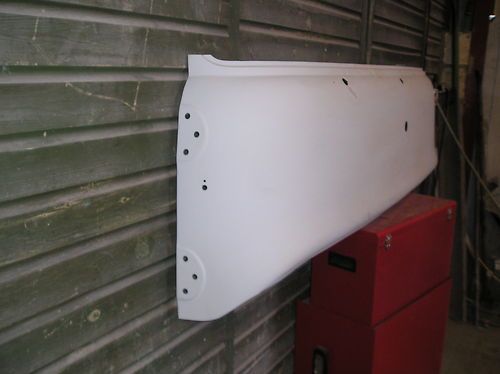
| The completed door. |
Subscribe to:
Posts (Atom)